Thursday, April 28, 2011

Signs of Spring: Rhubarb Custard Meringue Pie

 I adore rhubarb.

My rhubarb plants are coming along nicely outside in the garden.  I have a huge planter tipped upside down over one of the plants to force it (more on this soon), and it is going to be beautiful. In the meantime, I decided it was time to clean out the freezer - so I decided to thaw out the two remaining bags of rhubarb I froze last spring.


If you are lucky enough to have outdoor space, and fortunate enough to have your own rhubarb plants, freezing it for later is easy.  Simply pull the stems and discard the leaves, then was the stems, chop into 1" pieces and throw into freezer bags.  I had very little time last spring to process much of the rhubarb in the backyard, so instead, I have been able to enjoy it all winter.  Frozen rhubarb is easy to use in cobbler, pie, stewed or baked.  It is best to allow it to thaw completely if you are going to bake with it.

I let the rhubarb thaw in a colander placed over a large bowl to catch the all the juices as the rhubarb melts.  This is a combination of juice and water, but it is tasty to reserve for later use in jello, if mixed with other fruit juice.


I decided to make a recipe from one of my longtime favourite cookbooks, Classic Canadian Cooking, by Elizabeth Baird - Rhubarb Custard Meringue Pie.  If you ever see this book at a garage sale, I highly recommend you pick it up, as this book is out of print. I particularly like this book because it is organised according to the seasons, and has lovely menus for different occasions, and many recipes are based on historic or traditional Upper Canadian cooking.


While the rhubarb thawed, I prepared my pie crust.  You need only a bottom crust for this pie. Mix the rhubarb with the flour and sugar mixture. This recipe has a little bit of mace in it, which is a lovely, but unusual flavouring.  Separate your eggs, reserving the whites.  Whisk together yolks, cream and melted butter.   Spread the rhubarb mixture in the prepared pie crust.   Pour the egg mixture over top, and place pie in 450 degree oven.  Reduce heat to 350 after 10 minutes. Bake 35- 40 minutes, or until custard is set.


 While the pie is baking, whip the egg whites with vinegar and salt until they form stiff peaks.  Add sugar and vanilla. Elizabeth Baird's recipe uses three egg whites, but I only used two as to not have a leftover yolk (her meringue would be higher than mine). Spread meringue over pie.  Sprinkle with sugar and bake for another 4 minutes at 425 degrees until golden brown.


Et voila.  Allow to cool, and serve as soon as possible.  Meringue does not like to be kept waiting!  It gets weepy if you're late for dinner. 


Rhubarb Custard Pie, adapted from Classic Canadian Cooking: Menus for the Seasons, by Elizabeth Baird, published 1974 by James Lorimer & Company.

Filling:
2 1/2 cups chopped rhubarb
1 cup white sugar (I used about 3/4 cup)
2 tablespoon flour
1/2 teaspoon mace
2 egg yolks
1/2 cup light cream or milk
1/4 melted butter

Meringue:
3 egg whites
1/2 teaspoon vinegar
1/8 teaspoon salt
6 tablespoons white sugar (I used about 3 teaspoons)
1/2 teaspoon vanilla
1 teaspoon white sugar (to sprinkle on top of meringue)

Sunday, April 17, 2011

Family Recipes: Part II


 In a second series of embroidered pieces containing family recipes, I used yet more recipes from my Grandma Blanche's recipe books.  Some of the recipes are odd; who would need a recipe for making cheese toast?  Here again, I translated all the marks on the page onto the cloth, all punctuation, underlines and page breaks, but I made each piece the size of a recipe card. Each recipe is then approximately life size.


With this second series, I embroidered the pieces on two layers of discharge silkscreen printed cotton organdy.  (Discharge being a printing paste containing a chemical that strips the colour from the cloth). Of course you can barely see the print on the pale yellow organdy.

 
My Grandma Jean was not a domestic doyenne, though she had five children and ran an efficient household.  She was much more interested in the outdoors and intellectual pursuits.  She prefered extremely simple cooking.  I remember once she had made Date Surprise Muffins - the surprise being, she said, "I was too lazy to chop the dates, so I poked a date into the middle of each muffin.  Be careful of the pits".  

However, she did have a small repertoire of famous baked goods - waffles, molasses cookies and square bales in particular.  See above her recipe for molasses cookies written in her perfect school teacher script.  These are a drop cookie, soft, cakey and chewy. Molasses was a favourite of my grandfather - he liked to put blackstrap on his oatmeal.


Grandma Jean liked to give imaginative names to different foods - perhaps a way of convincing my father, his two sisters and two brothers to eat their meals.  Cream of wheat was Snow Porridge, cornmeal porridge was Sun Porridge.  Square Bales were simply brown sugar oat squares, but living in the rural setting of our family farm, where hay and straw were taken off the fields every year, the name Square Bales  seems more romantic and appropriate. 

Sunday, April 10, 2011

Cherry Tarts


Yesterday was a sunny, perfect, spring day.  I dried some washing on the clothes line for the first time, and put my little tomatoes and eggplants outside in the sun.  They'll now be going outside everyday.  I also put a large forcing pot over one of my rhubarb plants - more on that later.

Last night was a going away party for a friend and we had a potluck dinner.  Predictably, I usually bring dessert.  It was nice to have an excuse to make some fancy tarts.

Pie crust recipe written in the back of an old edition of the joy of cooking in my mother's handwriting.

Sometimes I use other pastry recipes - like pâte sucrée, pâte brisée or sourcream pastry, but usually I use Grandma Blanche's 'No Fail' pastry recipe.  I think it is pretty common pastry recipe, so perhaps it's your grandmother's recipe too.  Her recipe calls for 1 lb. of lard, but I use butter instead.  I have made the recipe successfully with lard as well, which makes for a much flakier pastry, or half lard and half butter.  I like butter pastry best.


This recipe makes enough for 2 generous two-crust pies. Start with your dry ingredients in a large bowl:
5 cups of all purpose flour
1 tablespoon of granulated sugar
1 teaspoon of salt (or use salted butter)
Mix with a fork.


Then add 1 lb. of  cold butter. You need to cut the butter into small (1cm) pieces with a sharp knife, and then cut it into the flour with a pastry blender. If you don't have a pastry blender, or if you want to save time, grate the butter into the flour with a cheese grater using the large holes.  This is a trick I picked up when I was working at a tea room where I had to make large quantities of pastry everyday.

If you grate the butter, you do not need to cut the butter into the flour with a pastry blender.  The pieces of butter are already small enough - just mix to incorporate with your hands.  You might want to break apart any large chunks, but leave the butter in pea-sized pieces.  The pieces of butter will melt when your pastry is baking, creating airholes and a flaky pastry.


It should look chunky like this.

Next, add your wet ingredients.  In a measuring cup, place:
1 beaten egg
1 tablespoon vinegar (or just a splodge, don't ask why, but the acidity helps balance the pastry)
1 cup cold water (if the weather is hot, you can add ice cubes to make it very cold)


Add the wet ingredients to the flour, but do not add it all at once.  Depending on the humidity of the air, you will need more or less liquid.  Use your hands to incorporate, adding just enough liquid to moisten the flour, but not as much liquid as to make the pastry sticky. If it is too sticky, add a little more flour. When it starts to come together, knead the pastry in the bowl to create a smooth dough.  The key is not to handle it too much, making the pastry tough.


Divide dough in half, or quarters with a knife and flatten into discs.  Wrap in wax paper and put it in the refrigerator to rest, and chill about 1 hour.


For these cherry tarts, I used 2 quart jars of the cherries I canned last summer.  To use fresh cherries, I would have to wait until July!  To use canned cherries, I strained off all the liquid (I'll save this an make jello - yum). To use frozen cherries, allow to thaw completely, and strain off liquid.


Since the canned cherries were already sweetened, I did not add sugar, but I added 6 tablespoons of flour per quart of fruit, and 1 teaspoon of almond extract. Mix well to coat fruit with flour.  The flour will help thicken the fruit juice. If the cherries were fresh or frozen, I would add approximately the same quantity of sugar as flour.

Next, I rolled out the dough and cut it into 4-inch rounds.  Then I fitted the rounds into 3-inch fluted tart tins and filled each tart shell with the cherry mixture. Since the tart tins I have are various sizes, some shallow, some deep, I eyeball the amount.  Some of the tins are really quite old - they belonged to my great grandmother - but they're excellent tins.  Better than new.


Then I cut out oak leaves to place on the top of each tart.  Any shaped pastry will do, or you could choose to put on a full top, like miniature pies, but that is much more fiddly.  I scored each leaf with a knife, to make them look pretty. 


Ready to go into the oven.  The cherries will plump up as they bake.  Canned cherries always look a little deflated.

Bake in a preheated oven at 450 degrees for 10 minutes (this will crisp the pastry, allowing it to hold its shape).  Turn the oven down to 350 degrees and bake for another 20-25 minutes, or until pastry is golden brown, and fruit is beginning to bubble.


Once done, remove from oven.  Allow to cool slightly.  If you want to remove the tarts from their tins, it is easiest done while they are hot, but be careful not to burn yourself! (I have given myself severe fingertip burns from molten butter tart filling).  With the help of a butter knife, gently and ginerly, lift tarts from tins.  Cool on a rack.

I like to sprinkle them with a bit of white sugar. 


Share with friends, or eat every single tart yourself.  If you don't tell anyone, no one will know.

Monday, April 4, 2011

Family Recipes: Part I

This recipe for drop-cookies is from Grandma's neighbour, Mrs. Myrtle Allwell.
These embroideries are part of an on-going series of work based on my collection of recipes belonging to my grandmothers.  I have original recipe books from both my maternal grandmother and her mother, and copies and scans my aunt made me of my paternal grandmother, her mother, and mother-in-law.  Some are recipes I have made myself, or tasted as a child.  Others, I've never tried, but just like the sound of them, or not at all. 

These three embroideries are from Grandma Blanche's notebooks.  She traded recipes with friends and neighbours, and sometimes the name of the lady who gave the recipe is written on the page.  Some are written in Grandma's hand, others have been given in the hand-writing of the friend.  I love the scrawl of old handwriting, and it was important to me to translate the handwriting and punctuation exactly.  I embroidered the handwritten text onto pieces of old tea-towels and tablecloths.


In another series of embroidered pieces, Family Albums, I created portraits of family members I had never met, but only knew through photographs or stories told to me as child.  In one piece, I used my great-grandmother May's recipe for doughnuts as her portrait.  My mother remembers eating these delicious doughnuts. 

I have a scrap of paper on which May wrote the recipe in pencil. Someday I would like to try making these doughnuts, but Grandma's recipe does not provide any instructions - only ingredients, and even then, there is the vague direction for the amount of flour - "flour as for cookies".

More variations on the recipe series to follow.

Embroidered on a piece of an old apron with the pocket still attached.

Detail of my great-grandmother's signature. I love the holes and stains in the fabric.

Thursday, March 31, 2011

Grandes Dames: Grandma Blanche

Circa 1930s, in front of the perennial border.

This is the first in a new series of entries about the ladies and men who have played a formative role in shaping my thoughts on domestic activities.  There is no greater influence in my life in this regard than my maternal grandmother, Blanche.

Born in 1904, she grew up on a farm near Lynden, Ontario, where one of her designated chores was to hold the chicken still while her brother chopped off its head. Her father's farm was typical old-fashioned mixed use farm.  My great grandfather Frank grew a variety of vegetables and other crops, raised animals, made his own sausage and sauerkraut, and grew his own fruit.  He was also an amateur photographer and he processed his own film and photographs.  (More on him later).

Images of early life:  the old farm house, Blanche's brothers, Leo and Frank, and a favourite photo of mine, my grandmother and her sister Winnie, peeling potatoes - at work from an early age.
Blanche and Winnie on the beach at Port Dover.  'MBM' is how my grandmother referred to herself:  Mabel Blanche Mannen.

I love these old photographs of family and leisure life.  The family at the beach. The photo on the bottom left shows Blanche and Winnie again.

Blanche was the third of four children spaced four years apart, two boys and two girls.  My grandmother had only a ninth grade education because her parents could only afford to board her at Brantford to attend high school for one year. She spent much of her life working hard, in ways that I can only imagine, as a domestic servant, maid, store clerk, housekeeper, waitress.  She worked upstairs and downstairs in grand houses.  She worked in the dining room at Ridley College in St. Catherines.  She worked at Eaton's department store.  She worked at the Majestic Restaurant in downtown Hamilton.  She worked hard, and she was pragmatic and sensible.

She was the sort whose hands must always be busy, never sitting down.  When she did, she liked to watch tennis on television.  She read murder mysteries and crime fiction. But she was usually busy - cooking, cleaning, gardening, tending to hundreds of houseplants (African violets were a particular favourite), sewing, baking, canning, pickling. She was happiest when she was busy.

Perhaps typical of her generation, she saved everything.  Scraps of cloth.  Lengths of string.  Thread.  Yarn.  Bits of paper.  Buttons. Postcards.  Hardware.  Nails.  Screws. All of these things carefully organised into envelopes, tins, jars, and boxes, all carefully repurposed.  Much of which, I have inherited.

She baked mean pie crust, and made amazing lemon meringue pie. She was also a clotheshorse. More to follow on Blanche, her collections and her pie crust, in the weeks to come.

Tuesday, March 29, 2011

Spring Forward.

Eggplants with their seed leaves.

In winter, I hibernate. Hence the long silence from yours truly.  In spring, my energy returns, and so does my enthusiasm for things domestic. Last week, it snowed.  Nevertheless, now is the time when I begin to plan for outdoor activities later in the spring.  Namely, beginning the garden, which starts with seeds.

Back in February, I made a trip to Tregunno Seed Co. on Catherine Street North to pick up potting soil and pots. I ordered my tomato and eggplant seeds online, from The Cottage Gardener and The Cook's Garden.  The Cottage Gardener is a family owned nursery near Port Hope, Ontario, that specialises in rare heirloom varieties of tomato.  They have a vast selection of tomatoes, but also grow many other heritage and unusual varieties of other vegetables. The Cook's Garden is an American seed company.  They have a few varieties of tomato and eggplant that I like and have not found anywhere else.

Seed Packets.

Every year, I like to try a few new varieties of tomato, along with my favourites.  I love tomatoes, and in summer time, I eat several tomatoes everyday.  I also like to can whole and stewed tomatoes to eat plain and to cook with - San Marzano.  Last year I also grew a variety called Principe Borghese, an Italian variety grown for sun-drying.  These are repeat for this year. My ultimate standby is the powerhouse tomato Brandywine, a huge, beautiful, flavourful red fruit. Wonderful for eating fresh, cooking and preserving.

This year, I may have slightly lost my mind as I decided to grow 11 different varieties.  2 varieties will be for preserving - canning and drying.  The rest will be for eating fresh, and canning as well.

This season's other players are a multi-hued cast ranging from white (White Queen)  to yellow-orange (Jaune Flammee, Nebraska Wedding and Valencia), to multi-coloured (Big Rainbow), to red (Rose de Berne and Bloody Butcher) to purple (Black Krim).

Seeds are amazing.  An enormous tomato plant will grow from each of these dry little seeds!

 Once I have the seeds planted (3-5 seeds per pot), I water them, and place them inside these plastic domes in a sunny window until they have germinated.  Once the plants start coming up, I will begin rotating the trays - the plants seek sunlight, so will lean toward the light -  unless rotated daily, you will have spindly, crooked plants! Once the plants are about 1-2 cm tall I remove the domes.  If the weather is warm, I will put the dome-covered trays outside.  In the sun, the trays become like mini greenhouses.

Tomatoes toasty and warm in their little greenhouses.

Three weeks ago, I planted 5 varieties of eggplants, and I now have little seedlings.  Soon, they will need thinning, but I am waiting until they start to get their second leaves. As soon as the snow melts, I will begin putting them outside in the cold frame during the day.

My darling eggplants. Are they not adorable?

After danger of frost, I will plant my babies out in the garden -by my Grandma Blanche's rule of thumb - after the May 24th holiday, or when the black walnut trees begin to leaf.

Tuesday, October 19, 2010

The Fruit Cellar of Miss H...


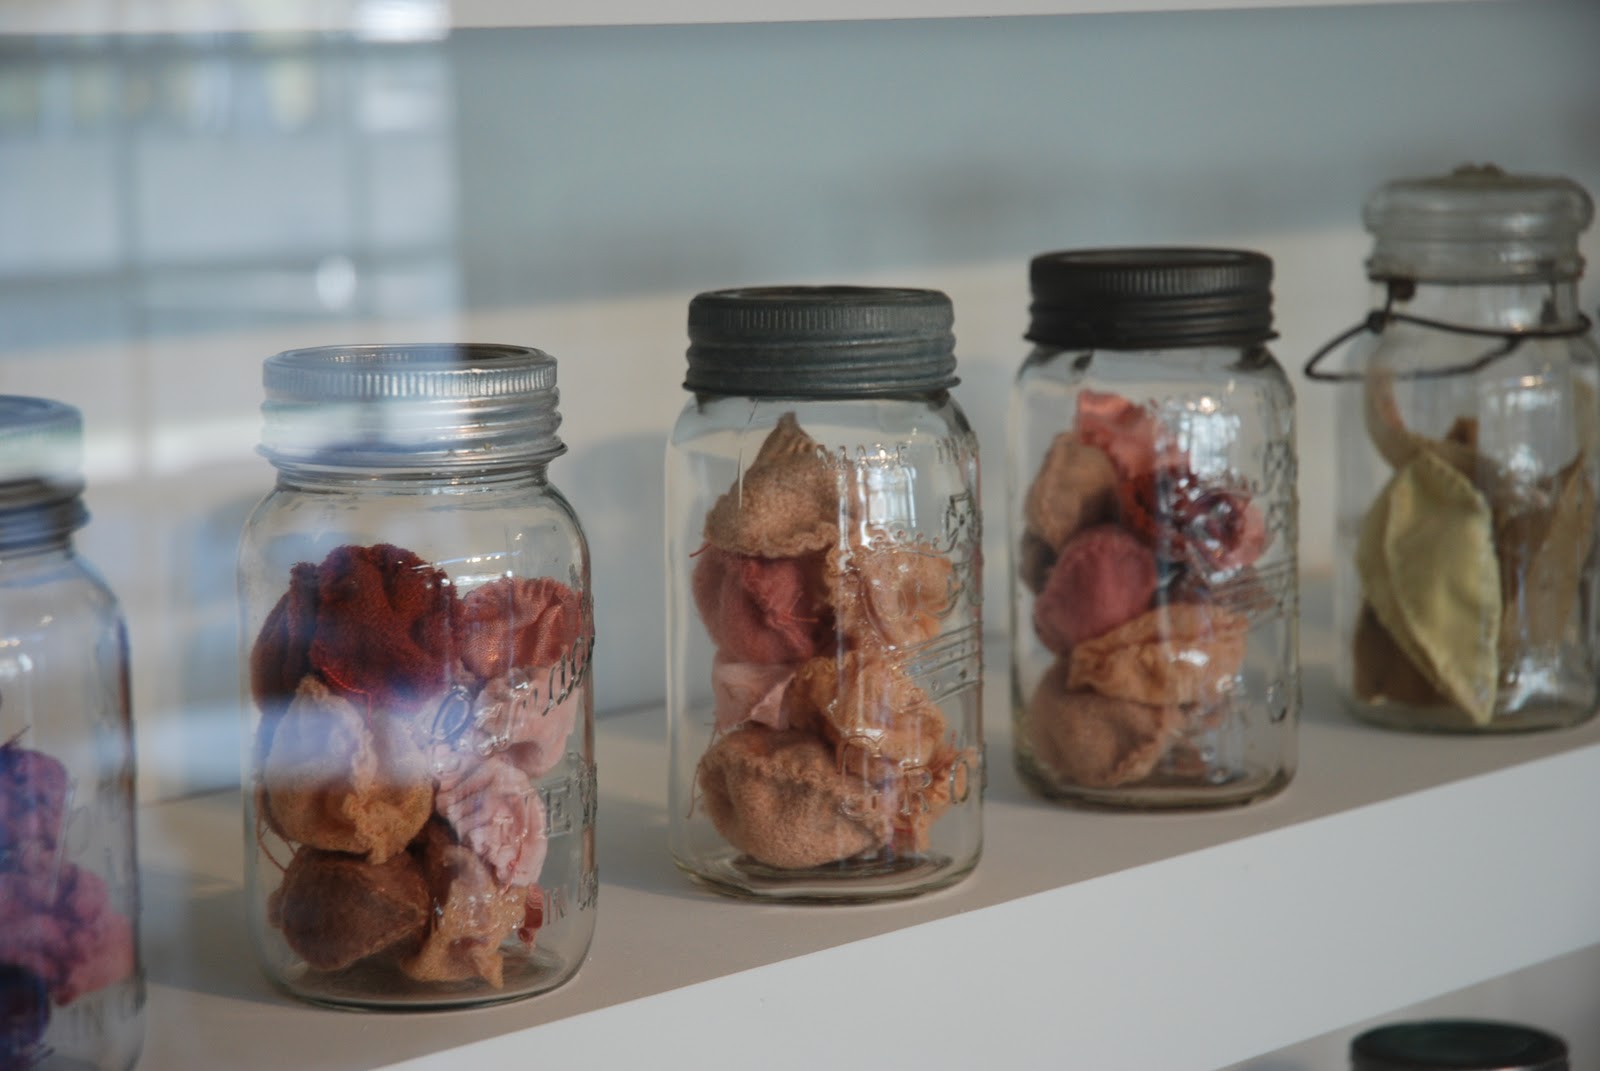
Today, more photographs of my installation, The Fruit Cellar of Miss H...  in the Project Window at Harbourfront Centre. The exhibition continues until Sunday November 7, 2010.

I was an artist-in-residence in the textile studio at Harbourfront Centre from 2006-2009.  I always enjoy installing pieces at Harbourfront because their wonderful installation crew is immensely talented, and because the Visual Arts and Crafts curators, Patrick Macauley and Melanie Egan are a such pleasure to work with.  You just want to please them.

Below, I have included my artist statement from the didactic panel at Harbourfront Centre. Not included in the panel information was the materials I work with - a lot of cotton organdie (I love the pliant nature of it, how it responds to being shaped so obediently) and all sorts of wools, some silk, some linen.  Much of the fabric I dyed using natural dyes - Queen Anne's lace, goldenrod, Lady's Bedstraw, madder, logwood, black walnut, pomegranate, cochineal - and some of it I screen-printed using discharge paste, earth pigments and gold leaf.  All of the screen printed imagery is taken from old recipes, photographs and ladies' magazines from the 1930s. All the fruits and vegetables are hand-stitched sculptures. The majority of mason jars (the Crown jars) were my grandmother's, the rest have been acquired at flea markets and antique markets, especially Aberfoyle.

The work is difficult to photograph as it is behind glass, and directly across from a brightly lit window.


Artist Statement
Preserving. Formerly, this household task occupied much of summer and autumn, in order to conserve fresh food for consumption during winter, when it was a scarce. The filled shelves of a cold cellar afforded a sense of accomplishment, virtue and security. This pursuit, so representative of ‘old fashioned values’, is lately experiencing resurgence as we place more importance on the provenance of our food.
Each year, I can fruits, pickles and jellies. This is an inherited habit. A few jars put down by my grandmother still remain after a quarter century.  In particular, one treasured jar of her pickles has become like a votive from her to me. This seemingly mundane object acts as a time capsule of seasons and places past, preserving her memory.
This body of work imagines the fruit cellar as a storehouse of memories. From season to season, the contents of each jar are imbued with vestiges of the past, triumphs and regrets, joys and sorrows. The vessels are an investment in the future as much as they are reliquaries of the past.  The fruit cellar acts as a hope chest of both realised and unrequited aspiration.